How to quick install and start your website right away with wordpress
WordPress is an awesome content management system designed for everyone. If you are a simple blogger and you want to share your thoughts with other people, or you want an advanced website wordpress is for you. It is quick to setup and easy to customize. WordPress won the Overall Best Open Source CMS Award in the 2009 Open Source CMS Awards.
In this tutorial i will show you how to quick install wordpress as a CMS for a website.
Advantages of wordpress as CMS:
- Very quick installation and initial customization
- Plugins available for almost everything, you don’t have to do it by yourself, just install and customize if you need
- Thousands of free and premium themes available to download
- Very easy to make custom modifications and adjustements of everything, themes, plugins
First of all, before we get into it, let’s see what we need to install wordpress:
- A place where to host it. If you already have a hosting account with php and mysql support everything is fine, else, you should consider buying one. I’m using host gator and i am very happy with. It is very simple to manage.
- A FTP client software. I recommend filezilla, it is free!
- A browser
We have what we need so we should start.
0. Pre-install set-up
Firstly, you need a hosting. I recommend hostgator, it is very easy for you as a started but it is also good for anyone. To get started you should first get a hosting account.
0.1. Database setup.
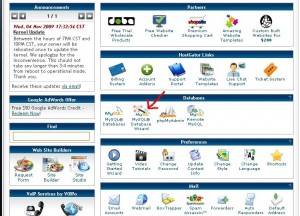
WordPress is written in PHP and is using MySQL database. We need to create a MySQL database. Go to your web hosting control panel and go to MySQL manage section. If you web hosting company is using Cpanel for hosting administration you should go to MySQL Database Wizard as shown in the image below:
Now enter a name for your database, for example: wordpress. In the next screen you choose a username and a passowrd for the database created. Then check the box which says “ALL PRIVILEGES” and press the button “Next Step” .
Now you are practically done with database setup, but keep in mind, if you used Cpanel for both database name and username you have to use your hosting account username in front of them. For example if you selected username wordpress and database wordpress, those will be: “yourhostingusername_wordpress” . The password will be exactly the one that you entered.
If you have a custom made hosting control panel then everything will be very well explained in the respective pages, just find Mysql database management and create a database with an username and a password. Write them down because you will have to use them at Step 1.
Now we have the database created so we can go to the next step.
0.2 FTP setup and files uploading
If you are using Filezilla as i suggested, open it and you will see a connection bar at the top.
Enter the ftp host, this will be ftp.yourdomain.com or yourdomain.com in most cases. If there will be something else your hosting provider will tell which is it.
The ftp username and password are different from mysql username and password. They are also provided by your hosting provider, or you can setup a ftp account in your control panel. In most cases, the user and password that you use to connect to your control panel are the same with the username and password that you use to connect to your control panel.
Type them in the respective boxes, leave the port empty and press QuickConnect.
If you use something else than filezilla you are probably familiar with that and know how to connect to a ftp server.
Your main domain of your web hosting points to the public_html/ folder. WordPress files can be uploaded directly into that folder or you can make a sub-directory for the wordpress installation.
Now, download the wordpress files from here , extract them into a local folder on your computer and then upload them with the FTP client. If you want the wordpress installation to be in your public_html folder ( recommended ) you will have the following directories: public_html/wp-admin/ , public_html/wp-content/ and public_html/wp-includes/ .
You’re done with the FTP thing too and you are ready for wordpress installation.
1. WordPress installation
Open your browser and type your domain in the address bar. You will get a welcome screen and then click on “Create configuration file”.
On the next screen, write your database name, username and password created at step 0.1. Don’t forget, if you used Cpanel to create database it is likely that you have to write your hosting account username before the database name and user ( not for password too ).
For host, leave localhost. If your hosting server hosts the databases elsewhere, you should have been already alerted many times about this.
The table is not important at this step. You have to change it only if you want to install wordpress twice in the same database. I don’t recommend doing this. If you want 2 wordpress installations, use separate databases, or use wordpress multi user, which is the same software designed to handle more websites in the same time from the same administration panel. I will get into that in a future article.
Now you-re done, choose a blog title and your e-mail address, don’t bother because you can change them later.
Your main username is admin, and a password was generated for you, a copy of it was sent to your e-mail address too, if the server is able to send mails. If you did not received any mail, check your bulk/spam folder, if that is empty too now you know that your server can’t send e-mails trough the mail function. Advanced configuration have to be set in order to send mails, but for now you are fine too without e-mails.
Press the button and you will be redirected to the login screen that will bring you to the administration panel. Have a good look at that and try to figure out where each section of administration panel is. Most things are self explanatory, and now you probably will get trough each link and see what everything does, but if you are in a hurry read this article to the end and you will make the changes that you need to get your site up as soon as possible.
2. WordPress configuration
2.1. Theme setup
You can check how your website looks pointing your browser to the domain/subdomain/folder you have installed wordpress. The administration panel can be accessed by yourdomain.com/wp-admin/ , write that in the address bar and you will be prompted to enter username and password to login to the admin panel.
You website has the default theme activated, you are not satisfied, but you have the option to browse the wordpress free themes directory. 1200 free themes are waiting for you out there.
WordPress themes are also available in other places, free or not. If you like the theme doesn’t matter it is free or not, just get it.
I will explain how you can change your theme in 2 ways.
2.1.1. Download and install the theme automated
Later versions of wordpress have the ability to download and install themes trough administration panel. You will notice that the menu from administration panel is divided in sections. You can expand or collapse the items.
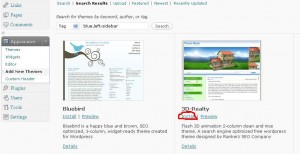
Go to “Appearance” section in the menu and press on “Add new themes” link. Now you can search for themes, either by keyword, for example: “iphone” or “twitter” or “animal”. You will get the themes that have that keyword in description.
If you want to do a better selection, use the filter. You can filter the themes by colors, number of columns, width, features or subject. Now it is up to you what theme you use. Choose the theme that you like the most.
Once you have selected the theme you want to use, click “Install” link under the screenshot.
A small pop-up will appear and now you click “Install now”. The theme files will be downloaded in the wp-content/themes/ folder.
At this step, you may encounter some problems due to file permissions. The directory where wordpress is trying to download the files is not writable. You can fix this by connecting again trough FTP, go to wp-content . Right click on themes folder, choose “File permissions..” and change file permission numeric value to 777. Well, this is not a recommended operation. You can install the theme by using the second method which is trough FTP upload that i will explain next.
If everything went fine, just press “Activate” and the theme is ready to use. If you succeded to install the theme in this way, skip the next section where i will explain the other way to install a theme.
2.1.2. Install a theme trough FTP upload
If the above method didn’t worked for you, or you simply want to install other theme that you can’t find on wordpress themes directory read below and you will find out how to do it.
First of all, go back to the FTP client, open it, connect it and point it to your wp-content/themes folder. This is the folder where all themes belong. Maybe you noticed that another subfolder in your wp-content/ folder is plug-ins. You are right, that is the place where plugins belong, but we will discuss that later in this article.
To install a theme trough FTP upload you need first the theme files into a folder on your computer. You have to download the theme. If you want themes for wordpress directory go to http://wordpress.org/extend/themes/ and search/browse themes until you find the right one. Once you chose a theme press the big download button in the right.
You will get a zip archive that you have to extract locally on your computer. Upload the directory that you have extracted into wp-content/themes/ folder. After upload your theme files will be into your wp-content/themes/yourtheme/ folder. If you bothered to open the theme folder, you can see that there are some php files like index.php, page.php, single.php, archives.php, header.php, footer.php, sidebar.php, and a stylesheet style.css . The .css file have the styles for the whole website, while the .php files each represent a section of your website.
Now you don’t need to change anything, but for reference, header.php, footer.php and sidebar.php will define the layout of header, footer and sidebar and it will be active for every area of your wordpress, on a page, on a blog post, on an archive page or on a blog post list page.
The files page.php, single.php, archives.php and single.php will define the layout for a page, a single post, post archives, and post list page.
After you have uploaded correctly the theme, go to your administration panel at Appearance -> Themes. If the theme was uploaded it should show up there. Press on it’s screenshot and you will get a preview. Then press the “Activate” button in the top-right.
Now you’re done, your theme is up and activated, check how your website looks now.
If the theme you uploaded does not appear in the theme list, it is probably because the theme was not uploaded in the right directory. Check that on your theme folder, the files listed below are directly there and not into other subdirectory. For example, wp-content/themes/yourthemefolder/yourthemesubfolder/ won’t work.
Now you’re done with the theme, we need one more step in out journey to quick set-up a website using wordpress platform.
2.2. Basic configuration of wordpress
2.2.1. Administration panel features quick presentation
Before i get into step-by-step basic configuration i want to tell you few words about each menu category in the administration panel:
- Dashboard. Here you get a quick overview of what is happening on your website: comments, links, stats.
- Posts. You have links for editing posts, adding, view tags, edit categories.
- Media. Something you will not use so often because you will add everything related to media: images, videos from add/edit posts and pages sections.
- Links. If you want to have site wide links to other websites or blogs, here you can set them up without making any change to your template files, just add/edit/delete links that appear in your site sidebar.
- Pages. Here you add and edit pages for your website, it works similar to posts. This is the main thing that powers wordpress to be the best CMS around.
- Comments. I never pressed this link, if there are new comments waiting for moderation or review, they will be displayed in dashboard with links to the comments management.
- Appearance. We already went trough some links of this menu category: adding and activate uploaded themes. The other two are for theme editor which will live edit the template files ( header.php, style.css, footer.php, page.php and others ), but i still prefer to download edit the theme trough a ftp client because it let me use my favourite code editor which is good for code highlighting and simplifies your work. There are many good code editors that wordpress file editor can’t compete with.
- Plugins. WordPress plugins system is the thing that makes wordpress so awesome. If you check the wordpress plugin directory you will notice that there is a plugin for everything. From administration related stuff: comment spam protection, search engine optimization, rich text editor enhancements, to front end widgets: polls, related articles. It is so simple, just download and activate the plugin and your site is protected from comment spam. One click away from advanced SEO configuration, most of them are automated. Everything you can imagine is out there waiting for your click to be added to your website. I will present the must-have wordpress plugins for any website in the bonus section of this article.
- Users. WordPress is multi-user, so you can have more that 1 person who check and update the website, from this section you can add other users. You can change your name, your description, but in most cases you won’t use this. Combined with a plugin that shows information about the author of every article, you will want to change your name and description if you want to display them on your post pages. If you are the only one who writes in the blog section of your website ( if you have a blog section ) you will not use this feature, but on your website blog there is more than 1 author it is a good thing to have the author box.
- Tools. This section is most used for upgrading your wordpress. These guys at wordpress are changing things very fast so they added a feature to auto upgrade the wordpress installation to the latest version available. IT works great, they really love the one-click things. Also, don’t forget to backup your database often. You should do this every time you make a new page or publish a new post. I don’t think you will be happy to lose your work.
- Settings. Self explained category, i won’t enter in talks about this as i will go quick trough each of them on the next section about essential stept to get the site in good shape.
2.2.2. General basic configuration
Your wordpress website is ready, but to get it where you want to you have to go trough basic configuration.
In Settings menu category, click on General, and there you set basic stuff: Blog name, blog description, date format. Make sure you disable “Anyone can register” box, you don’t need other users right now. The can still post comments to your blog without registering.
Step to “Reading” link from Settings menu category. Here you can set what page to be you home page. Before to select that you have to create a page. Go to Add new page and you can add a page called “Home”. Don’t write the text right now. Back to the settings, at “Front page displays” check the box that says “A static page” , and in the next box, select your “Home” page. Probably you don’t want a blog right now. If you don’t set any page for Blog posts page, the post will not be displayed, so no blog, just website. Later you may want to add a blog page. To do that, create a page called “Articles”, or “Blog”, or whatever you want and in the Reading section select that page as “Posts Page”.
And the last important thing. It is very important, because it sets how your URL-s to look like. But before, let me ask you something, what URL you prefer: yourdomain.com/page=233 or yourdomain.com/how-to-quick-install-wordpress/ . Well there is a long debate about how URL’s should look, but someting is certain: you have to change them from defaul. Go to “Permalinks” and you can see how they are looking now and wordpress makes some suggestions for you. There are only some suggestions, but you can do it in whatever way you like. Select the box “Custom Structure” and i will tell you what you have to enter there for most popular URL rewrites.
- yourdomain.com/page-name/ – /%postname%/
- yourdomain.com/page-name.html – /%postname%.html
- yourdonamain.com/page-name.php – /%postname%.php
2.2.3. Creating pages
Now everything is setup, you need just to create your pages. Go to Pages section and click “Add new”. Add whatever page you want.
Depending on what you want to show on your website you are free to add anything.
The page and post editor has 2 mods: visual mode and HTML mode. In most cases you don’t have to use the HTML editor, but there may be some reasons to use it, but for now, get used with the visual editor. Things there are very simple, if you know how to write in word you can write in wordpress RTE editor too.
To insert an image into editor you have to press on Upload image button, then a pop-up will open and you have to select the file from your computer. After the page is uploaded select the size you want and if you want it aligned to left, right, or center.
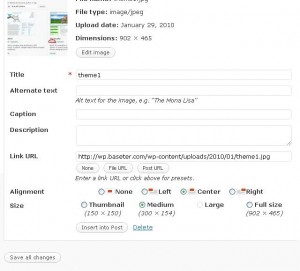 After you select the alignment and size, press “Insert into POST”. If you press Save all changes instead, the image will not be added to the page. You have to go back to Add image, select Gallery from the top, select the image you want and then press Insert into post.
The video upload is working in same way, but if you want to embed an url from youtube or other video sharing website, copy the embed code, switch to HTML editor, and add it where you want it to appear. This way is faster.
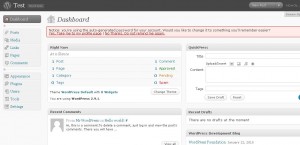
When you first use the editor, not all available button will be displayed. To see them all you have to expand the editor toolbar pressing the “Show/Hide Kitchen Sink”. It is positioned in the right on the available toolbar, like in the image below.  If you want to create a list with bullets, just press the “Unordered list” button.
Other basic things that you have to set for a page are: Parent category and Order. If you want a page to be the child for other page just select the parent page. If you want to have specific order in the menu you have to set an order number for every page, for example 1,2,3 etc. They do not need to be consecutive.
Now your website is ready to rock, you have your pages setup, your visitors know what the site is about, what services you provide, what lists you have to give them or anything you want to do with your website.
You want to make a website to present your web design company. Create a homepage where you tell something about your company and show the best 2 design you ever done. A second page where you list your services and prices. A third page with portofolio where you list all projects you worked for. To easily add projects to the portofolio page i suggest suggest you to make this page the post page, and every post will be a new project that you have completed. Set the post page to be the Portofolio page and then for every project publish a post. Another page for testimonials and a last page for contact. You are done.
Doing this will take you less time that it took you to read this.
3. BONUS: Installing plugins and must-install plugins to start your website with.
3.1. How to install a plugin
Similar to themes, here are two ways to install a plugin, the quick one directly from administration panel, or the longer one trough FTP. All of you would like to choose the short one, but if the permissions are not set right and you don’t know how to deal with you don’t have a choice.
3.1.1. Installing a plugin trough administration panel
Go to plugins category and press “Add new”. Enter the keyword to search in the database, for example: “poll” or “contact form” or “author box”. You will get a result with all plugins found using the keywords you entered. Don’t click on the name of the plugin, that link will bring you to the plugin’s creator homepage. If you want to install a plugin press the “Install” link in the right. A pop-up will show and you click “Install now” . You will get a link to activate the plugin. Press it. Almost every plugin will add you a menu link, search for it near the Plugins or Settings category menu. Depending on the plugin, further actions are necessary to configure the plugin, but this is completely different for every plugin.
3.1.2. Installing a plugin trough FTP
If you tried the method above and it failed, you must download the plugin manually. Go to wordpress plugins directory and search for the plugin you want. Click on it, download, extract, and then upload it into wp-content/plugins/ directory in your wordpress installation folder.
Then go to Plugins -> Installed and press “Activate” link under each plugin you want to activate. If you go there right now you can see that there is already some plugins loaded but not activated. One of them “Hello Dolly” is just for fun, it will show you a random lyric from Hello Dolly song. It will show only on administration panel, so no change for your visitors. Other plugin that comes default with wordpress is Akismet spam protector, but i will discuss it in the next section.
3.2. Must-have plugins for any starting wordpress website
3.2.1. Akismet spam protector
This plugin comes with wordpress by default, so you don’t have to download it again. Just go to plugins and activate it. It is true that if you don’t have comments open this plugin is useless, but for sooner or later you will have to post some articles and want your visitors to reply. So, this plugins rocks. After you activate it, you have to configure it.
Under the Plugins menu category, “Akismet Configuration” link will appear. The only thing you have to do is to enter there an wordpress API key. To get one quick, go to this page and register an wordpress account. You will get the API key by e-mail. Copy and paste it in the right box. Press “update options” and everything is done. Your website is protected from spam comments.
3.2.2. All in one seo pack
This plugins does what it says. Search for it in plugin wordpress directory or in “Add new” link on administration panel and install it as described above.
Go and activate it. Then go to plugin configuration page in the “Settings” category. Check the box where says “Plugin status” to “Enabled” and choose a title, description and keywords for the main page. You can write anything, you can leave blank too.
For every page you have, this plugins created automated title, description and keywords meta tags based on what your page content and title is. You can also add custom title, description and keywords, but this is only if you know SEO.
3.2.3. Wp Contact Form
A good website must have a contact form. Your visitors have to go in contact with you, in this way you build relations with them. Maybe someone likes your website and want to buy it. You don’t want to sell, but what if he makes you an offer you can refuse ? Maybe someone want to give you some money to get their banner to your website, but what those people do if they can’t get in touch with you ?
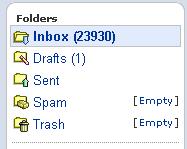
Posting your e-mail address ? Very next day you will get your inbox full of spam mails and believe me, you don’t want your inbox to look like this:
That picture is taken from my old yahoo account. I don’t use it anymore because of SPAM. I made a mistake to put my address on web pages and now it is useless. Yahoo spam filter could not handle it, now i use gmail. But that was not their mistake, it was mine because i left my e-mail address on public pages.
Get Wp Contact Form plugin, activate it, and then go to the page you want to display Contact form. In most cases this is “about” or “contact” page. Write some text and then switch to HTML editor and add the following code: <!–contact form–> . Exactly at is it written here.
Contact form also have some option that you have to configure, for example confirmation text, fields, you can do this in Settings menu category at “Contact Form” link.
That are most important ones, there are many others, only in wordpress plugin directory are about 8000 plugins. Not all plugins are listed in wordpress plugin directory, you can find plugins elsewhere too, some of them have a price, others are free.
Now you really have a cool website and you can quick change everything trough it.
Disclosure: Some of the links in this post are "affiliate links." This means if you click on the link and purchase the item, I will receive an affiliate commission


February 3rd, 2010 at 2:50 pm
[…] Feb.03, 2010 in WordPress tutorials This guide is basically a short version of my other article How to quick setup a website on wordpress , but this is written for advanced internet users. In the other article i explained everything, […]
February 5th, 2010 at 1:19 pm
[…] it is a video version on my tutorial: “How to quick install wordpress as a CMS“, but it does not contain all explanations and theories, just […]
February 14th, 2010 at 3:19 pm
I can’t figure this out. Mind helping me?
February 14th, 2010 at 3:26 pm
Sure, please tell me what is your problem or what you do not understand and i will help you.
February 25th, 2010 at 11:08 am
[…] wordpress installation, if you want to maximize the wordpress potential, you have to know what administration panel can […]
May 10th, 2010 at 7:44 am
Hey thanks for the guide, just a small contribution to all, a coupon code for hostgator.com “MAYSPECIAL” For all of you who’s starting out this should help. It gives you a free month if you’re using their hatching hosting =)
May 10th, 2010 at 9:17 pm
Thank you for your help, a coupon is always welcome as we pay less for the same thing, but i won’t reccomend using the hatching plan. The hatching plan means you can host only one domain. Even if you start with one domain it is likely that you will want to buy another one very soon so having a hosting plan with only a domain allowed will be an obstacle in your success.
I’ve found that you can use “TENDOLLARS” coupon and you get 10 dollars OFF for any hosting plan.
December 3rd, 2010 at 11:02 pm
Can I install 2 wordpress blogs on the same hosting ?
December 4th, 2010 at 5:22 pm
Yes you can. The deal is with the database, if your hosting account allows you to create more databases, create a new one and use it to install the new wordpress. IF you have a single domain you can install the new wordpress in a new directory.
If you are not allowed to create multiple databases you can use the same for 2 blogs. When you install it you will be asked for the wordpress database tables prefix, change the prefix to wp2_ or something else and install it.
January 10th, 2011 at 1:44 pm
[…] thing that you do after you install WordPress is to search for a suitable and good looking template to use on your […]
April 22nd, 2011 at 1:25 am
I’ve been checking your website for a while now, seems like everyday I learn something new 🙂 Thanks
April 25th, 2011 at 7:40 am
this is really very helpfull for beginners… i really appreciate..
April 25th, 2011 at 5:19 pm
Brilliant writing, interesting and right to the point!
February 16th, 2013 at 6:59 pm
[…] is not good at only one thing. People use wordpress for different purposes: for blogs, simple websites, ecommerce websites, q&a websites, social bookmarking, social networks, job offer websites, […]