How to easy modify template files in wordpress
You installed wordpress, found a great theme, installed some plugins but you want to personalize the look of your blog. You need to change the copyright text, you want to add a custom header image, you want to make the post titles smaller or other changes.
To do that the best way is to quick change some values in the template. In the wordpress admin panel you have a theme editor, under Appearance -> Edit. You may expect that it will be something visual, where you select what you change and edit. Well, i’m sorry to disappoint you: All you get is code.
But there is not the end of the road, if you spend some time figuring out how things works you may be able to do minor changes without programming knowledge.
At the right of the Editor you will see the template files listed. They are divided in two categories: Templates and Stylesheet. The stylesheet is a single file in most cases, where all the visual components have attributes assigned. Here you can change most things about your blog design: title size, paragraph spacing, background color, almost everything.
Minor design changes in your blog design
How to know what to change in the CSS ? The things may look complicated at first sight, and they are complicated, but you can make your life easier with Firebug, a firefox extension. It takes only minutes to install but it will do miracles to happen.
Open Mozilla Firefox and go to firebug page. Click “Add to Firefox” and install the plugin. Restart firefox and open your blog page. Let’s start with the title. Right click on the title and then select “Inspect Element”, you will notice a toolbar opening on the bottom of your browser.
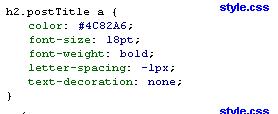
Don’t get scared, you are almost done. In the toolbar, you can notice the highlighted text. On the left side, it is the HTML code of your title tag, don’t pay too much attention. Now look on the right side, that is the CSS code that defines the style of the title tag. Analyze it for few seconds.
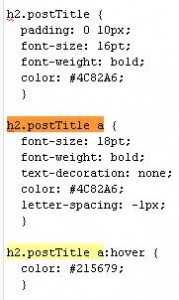
How is that ? Does it look familiar ? What color means ? Font size , font weight they are familiar things. It is close to human language. Your title font size is 18. You want to change this to 16. Notice the title of the section: “h2.postTitle a” . This is how the title is defined into your css file.
Now, go back to the wordpress theme editor, select your style.css file, and search for “h2.postTitle a”.
Here, you can edit everything, in that block, change 18 with 16. Then click Update File and refresh your blog page. Tada! Was it so hard ? Well, i bet you are so happy now that you figured out how to do things that you never thought is possible ?
Things are not so complicated, but you need the right guidance to figure it out.
You can do the same thing with all your blog design elements, do that for paragraphs, for links. At the frst you won’t be able to change everything, but after a short time you will get used with the HTML and CSS code and you will be able to make major changes.
If you want to know how to do something in css, for example to add a border to your text, search on google for: “csss how to [your stuff]”. For example: “CSS how to add border”, “CSS how to change color”.
The structure of wordpress templates
Now let’s go to more complicated stuff. Go back to the editor. On the files associated with the template you will see an unfriendly list and you don’t know where to start. Look for “Header”, “Footer” and “Sidebar”. These are general files that contain the HTML structure of the most important parts of your blog: Header, Footer and Sidebar. These are things that you will want to change on many occasions.
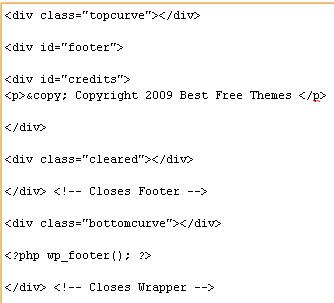
Let’s start with the copyright text on the footer. Click on “Footer” template file.
You will see something similar to the image above. The HTML code will differ from template to template. You can see the copyright that you want to update. All you have to do is to change that text with something you like.
If you know HTML, you can change the code in any way you want. The changes will be reflected in the blog design. If you don’t know HTML you must be aware, if you delete closing divs: </div> you may end up with a broken blog design.
If you want to add some analytics code here is the place where you want to paste it. Do the changes and press “Update”.
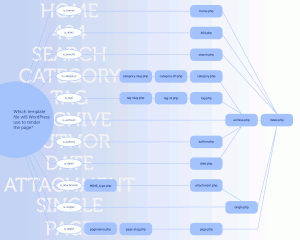
The other files of template are responsible for rendering different pages of your wordpress blog: Blog post list, Individual pages, Single post page. To get a better idea on how to change files, look carefully at the following image created by digwp : ( click to zoom ).
I wil ldescribe in few words how it works. If an user open a single post page, wordpress will use single.php file to render the contend. For single page he will render with page.php. If one of these files is not found in the template directory, he will use the next one as you can see in the image. The last one is index.php file.
Why there are so many when it can be one ? Because you want to show different things for different pages. For example in you blog list page you don’t want to show comment form, but you want to do it in single post page.
To not get confused, think about the main files: single.php the page where the single posts are shown, page.php for single pages and index.php for post listing. Start with these to know what you have to change.
Get the professional testking 640-822 training to learn how to modify files in wordpress and become expert in wordpress using testking 640-816 tutorials and testking 70-649 guide.
Disclosure: Some of the links in this post are "affiliate links." This means if you click on the link and purchase the item, I will receive an affiliate commission


September 7th, 2011 at 7:10 am
Great instructions Lucian. You have helped me make that first step into editing CSS. Thanks!