The best way to add Facebook to your blog
![]() Whenever you post an article you would like it to be re-distributed, shared and re-twitted thousand of times. To accomplish this is very important to make it very easy to share content on your website. Many visitors will like your website but if the sharing process is complicated they will never share what you write.
Whenever you post an article you would like it to be re-distributed, shared and re-twitted thousand of times. To accomplish this is very important to make it very easy to share content on your website. Many visitors will like your website but if the sharing process is complicated they will never share what you write.
The sharing should not involve more than one click. The easiest way to allow users to share your content is to show a like button for every article on your website. Like I have on my website:
People only have to click the “Like” button and your article will appear on their facebook wall. In the same time they can see how many people liked the article so they can know that the content is worth to read or to share.
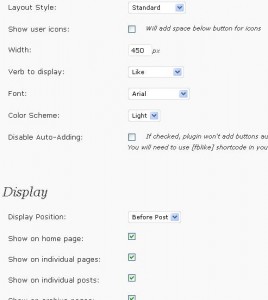
To add the like button to your website you have only to insall a simple lightweight plugin called FBLike. You can select where to display the like button, before content or below content. You can also set the colors and the verb to display: “Like” or “Recommend”. This is how the fblike administration page looks like:
I like it to have the standard view, light color scheme, and to display it anywhere: individual posts, individual pages, home page, search results, tag pages, archive pages. You can select not to display it on certain areas.
Something else you can add to your blog to make it easy to share is to add the facebook and twitter share button. They can look like this:
I think facebook, twitter and digg are the most important places where you would like your work to be shared. I display the buttons only on single posts are displayed, at the top of them. I experienced and that is the place where most people tend to click to share when they like an article.
To add the buttons I don’t use any specific plugin, I simply write the code into the single.php template. To make it easy for you I will share the code I use with you.
Here is what you have to do to add facebook, twitter and digg buttons to your website:
1. Go to Appearahce->Editor and select to edit Single Post Template ( single.php ) file
2. Before this code <?php the_content(‘Read more »’); ?> add the following:
3. Then open the Stylesheet file ( styles.css ) and add the following at the bottom:
.share_but { padding: 5px; float: left; }
4. Don’t forget to save the pages you edited and you’re done. Refresh your browser to see the results.
Disclosure: Some of the links in this post are "affiliate links." This means if you click on the link and purchase the item, I will receive an affiliate commission


January 12th, 2011 at 9:31 am
Lucian its the same WP Plugin that you suggested me. I am using it and it works perfectly.
January 12th, 2011 at 3:21 pm
I’m glad you find my recommendations useful
January 14th, 2011 at 10:52 am
any suggestion how can i add the fav icon to my WP blog
January 14th, 2011 at 1:29 pm
First, create the icon and name it favicon.gif or favicon.ico or whatever you want. Upload it to the root of your blog and then add the following code to your header.php file ( make sure the line will be between opening and ending head tags, usually where scripts and stylesheets are added ):
<link rel=”icon” href=”<?php bloginfo(‘url’); ?>/favicon.ico” type=”image/x-icon” />
January 14th, 2011 at 2:17 pm
Thanks for your help, will try it soon and shall give you an update.
January 19th, 2011 at 9:25 pm
Hello! I have read some of your post here and found it interesting and it makes a lot of sense. Plus i love your theme here. Thumbs up! Keep on sharing!
January 23rd, 2011 at 6:32 pm
Thank you.